So I’ve gone over why using matcaps can be an efficient way to get some good-looking materials in 3d graphics, but we also came across one of the main downsides of matcaps: they’re camera relative and that’s pretty limiting. So if we’re hell-bent on using matcaps we either live with this limitation – obviously unacceptable – or we hack the **** out of it!

Ever since I tried out Rodrigo Fernández’ tutorial on painting with render textures I’ve found a part of me always trying to solve problems with them. I won’t even blame you if you stopped reading this at the link and started following that tutorial instead – it’s worth it. Do you want to do a quick footprint system? Point a camera at a ‘canvas’ somewhere, spawn some bad boys on there and apply the texture back to your ground plane. Do you need to paint asteroid hits onto a planet’s surface with displacement? This example has 3 cameras hidden throughout the scene capturing the planet surface with dust, the emissive from the asteroid hit, and black and white rings for the displacement: Is it going to be the most efficient method to achieve certain things? Honestly, oftentimes not. Is it a great technique to aid you in a pinch or to do obscure things that might otherwise be rather complex? You betcha! The above giffy is from a weekend game-jam; I don’t think my turtle-brain could have come up with any other solution to get that effect over the course of a day.
So that’s exactly the technique we’ll use for our camera-independent matcaps. In fact, the concept is quite straight-forward, although we’ll [sort of] stop using the typical flat matcap image as the actual source for our material. Instead, we’ll bake out our material to a texture mapped onto a sphere:
See where I’m going with this?
Then we’ll set up a scene where we have an orthographic camera pointing at our sphere and ideally add occlusion layers to both it and the main camera so that the main camera can never see our matcap and our baking camera never sees our scene. For testing it’s not necessary but if you ever want to actually use this method you might end up with some delightful bugs if you don’t. I’ve also set my clipping planes pretty aggressively just to be safe. Finally, I’ve created a new render texture (right-click anywhere in your “project” pane > Create > Render Texture to create one) and pointed the camera to render to it every frame.
Now it’s time to write a simple script that will match the capture camera’s rotation to that of the main camera. For simplicity’s sake I’ve actually parented the cameras under empty nodes I’ll be using to control their rotations as if those nodes were their pivot points. So now we get something that looks like this in our scene view when we rotate our camera’s parent with the game running:Since the scene view camera isn’t duped by this trickery at all, we can see that the shading on the character is now changing based on the camera’s direction. If we look through our main camera we should see something more like this:
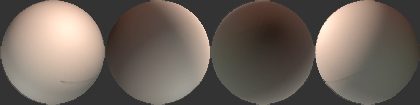
Nothing weird or interesting at all. Rather it simply looks like what you would expect from a normal material – which is exactly what we want. Here’s a look at four of the matcaps our camera is actually ‘baking’ out to the render texture as we go around:
For reference here’s the camera follower script I was using:
public class CameraFollow : MonoBehaviour {

    public GameObject followTarget;
    Quaternion offset;

    void Start () {
        offset = this.transform.rotation * Quaternion.Inverse (followTarget.transform.rotation);
    }

    void Update () {
        if (followTarget != null) {
            this.transform.rotation = followTarget.transform.rotation * offset;
        }
    }
}
Honestly that’s pretty much it. For this proof-of-concept the setup is rather basic but you can easily take it off the rails and do some interesting stuff with it. In this example I’ve extended it to have a script that also makes the hottest spot of the sphere follow the directional light’s rotation (plus an offset for ease-of-use):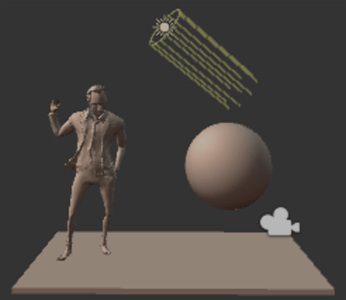
Light-follow script for reference:
public class LightLookat : MonoBehaviour {

    public GameObject light;
    public Vector3 eulerAdjust;

    void Update () {
        if (light != null) {
            this.transform.rotation = light.transform.rotation * Quaternion.Euler(eulerAdjust);
        }
    }
}
Now this of course comes with it’s own limitations, before we could simply paint a 2d image and get interesting or bizarre effects pretty quickly. This method not only requires you to pay the costs of a render texture, a potentially larger source texture and some extra geometry in your scene, but it also asks you to create a “3d” source. We can still get interesting hand-painted effects with the likes of Substance Painter, zBrush and the like but admittedly it takes a bit longer getting there. Just to prove the point though here’s a quick an dirty “stylized” version of our creepy skin ball:
Please excuse the careless use of Photoshop filters; I’m not proud of it but it was getting late…. Below is the effect on our actual character:

At any rate, thanks for sticking around! If [Part III] ever shows up perhaps we’ll try to stick these fun-times into the shader as opposed to using this hacky method – I can’t think of any reason why we couldn’t and it would certainly be more elegant. Otherwise we can take a look at some additional effects like layering matcaps with standard shaders! Oh the possibilities!!!
Until then!
-Greg

Hey! Thanks a lot for the shoutout to my article.
This is the first time I’ve heard about Material Capture and what you achieved is super impressive.
Im glad i could be of any help!
Thanks for the awesome write up.
LikeLiked by 1 person
Thanks Rodrigo, my pleasure! Hope it comes in useful 🙂
Many thanks in turn for your write-up; I swear I end up using the render texture technique in half of my Unity projects…
LikeLike
Hahah I get what you mean, I became addicted too, now I’m looking for ways not to use them as much. But they always come up again somehow.
LikeLiked by 1 person